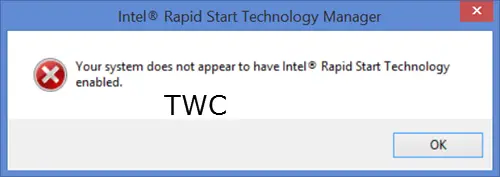
Your system does not appear to have Intel Rapid Start Technology enabled
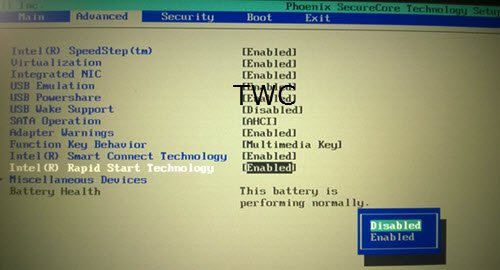
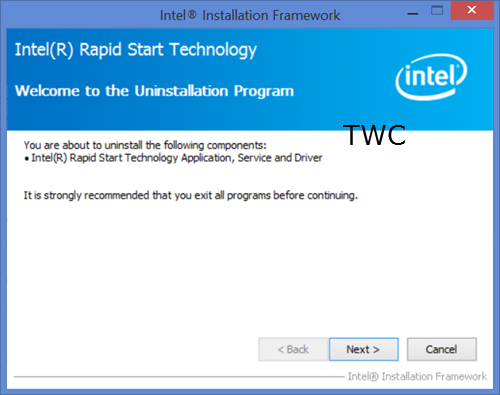
All I had done was to uninstall the security software it came with and installed one of my choices, and partitioned the C Drive into C and D drives. I have no idea why this error started cropping up, but it was quite frustrating to see this message box every time I started my laptop. There were no other problems being caused – but this itself was irritating enough. In case you receive this error message, here are a few things you may want to know or try out, and see if it helps fix the issue Intel Rapid Start Technology is Intel’s proprietary program and has nothing to do with Microsoft Windows. This technology is expected to make your system get up and running faster from even the deepest sleep, thereby saving you time and power consumption. 1] You should be able to see its icon in your taskbar. Hover over the icons till you see Intel Rapid Start Technology Manager. Click open the application. Once here, check if all the required settings are enabled. If in doubt, you can restore the settings to default. Specifically, Check that the status for Intel Rapid Start Technology is On, ensure that the Timer is set to On and that the slider bar is at position 0. This ensures the system will immediately begin utilizing Intel Rapid Start Technology once the system is put into sleep (S3) mode. Restart your laptop and see if it has helped. 2] Open the Task Manager and click on the Startups tab. See if any Intel entries are disabled. Specifically, see if .exe is enabled. Restart your laptop and see if it has helped. The main executable of Intel Rapid Start Technology is located at: C:\Program Files (x86)\Intel\irstrt 3] Open Services Manager by typing services.msc into the Run box and hitting Enter. Check if the Intel Rapid Start services is started and set to Automatic. Restart your laptop and see if it has helped. 4] Enter the BIOS. To do so on my Dell laptop, I restarted my laptop and kept pressing and leaving F2 key. You will see that the machine will not boot into Windows, but into its BIOS settings. Please be careful here, as if you make a wrong change, it can make your system un-bootable. So if you are unsure of having to deal with BIOS settings, best to, not try this suggestion. In The BIOS settings, check if SATA Operations, under Advanced tab is set to Intel Smart Response Technology.
Also, ensure that Intel (R) Rapid Start Technology is set at Enabled.
Press F10 to save the changes and restart your laptop. This was for a Dell laptop. Things may be a bit different for Lenovo, HP, or other laptops. 5] It should resolve your issue. If it does not, take your laptop to a Dell service center and ask him to fix it. 6] Well if nothing helps, there is always this option to uninstall Intel Rapid Start Technology. As I said, it is not a part of Windows, and you will not really lose anything if you uninstall it. To uninstall it, open Control Panel. You will see the entry Intel (R) Rapid Start Technology.
Double-click on it to start the uninstallation process.
Once the uninstallation is completed, you may restart your laptop. You will definitely not see this message box. If you have any other ideas, please do share them below in the comments section.